ZyXEL downloads – Firmwares, Support Notes, Data sheets, User Guides & Quick start up guides


I have been informed that ZyXEL has launched a new corporate website and in the glorifying process a lot of ZyXEL customer lost access to the ZyXEL resources FTP site which was accessible at ftp://ftp.zyxel.co.uk/

The good news is that the ftp site is still available @ ftp://ftp.zyxel.dk/

Please note that although this is still hosted by ZyXEL Denmark, corporate website (www.zyxel.com) is stays always best source of information and especially country specific downloads(such as the firmware ones used by DSL routers etc).

Happy downloading !

Posted in Firewall, Prestige, ZyXEL | Tagged , , , , | Leave a comment

Full Feature NAT on ZyXEL Prestige P-660 Series Routers


Full Feature NAT on Prestige Routers (P660R-D1, P660H-D1, P660HW-D1, P660HN-FIZ, P660HW-T1 v1/v2/v3 and other P660 series routers)

Another common question from customers, want to use multiple public IP addresses on prestige routers and would NAT them their internal IP addresses on one-to-one OR many-to-one basis, the process is very simple and explained below.

Scenario: Multiple Global IP addresses for clients and servers

(One-to-One, Many-to-One, Server Set mapping types are used)

Customer requirement

In this case we have 3 IGAs from an ISP.

We have two very busy internal FTP servers and also an internal general server for the web and mail.

In this case, we want to assign the 3 IGAs by the following way using 4 NAT rules.

· Rule 1 (One-to-One type) to map the FTP Server 1 with ILA1 (192.168.1.10) to IGA1 (200.0.0.1).

· Rule 2 (One-to-One type) to map the FTP Server 2 with ILA2 (192.168.1.11) to IGA2 (200.0.0.2).

· Rule 3 (Many-to-One type) to map the other clients to IGA3 (200.0.0.3).

· Rule 4 (Server type) to map a web server and mail server with ILA3 (192.168.1.20) to IGA3. Type Server allows us to specify multiple servers, of different types, to other machines behind NAT on the LAN.

Solution

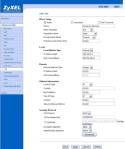
Step 1: In this case, we need to map ILA to more than one IGA, therefore we need to

choose the Full Feature NAT option from the NAT field in currently active remote

node, and assign IGA3 to P-661H-D’s WAN IP Address.

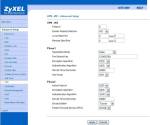
Step 2: Go to Web Configurator, Advanced Setup, Network -> NAT -> Address

Mapping to begin configuring Address Mapping Set #1. We can see there

are 10 blank rule table that could be configured. See the following setup for

the four rules in our case.

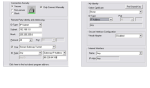
Rule 1 Setup: Select One-to-One type to map the FTP Server 1 with ILA1 (192.168.1.10) to IGA1 (200.0.0.1).

Rule 2 Setup: Selecting One-to-One type to map the FTP Server 2 with ILA2 (192.168.1.11) to IGA2 (200.0.0.2).

Rule 3 Setup: Select Many-to-One type to map the other clients to IGA3 (200.0.0.3).

Rule 4 Setup: Select Server type to map our web server and mail server with ILA3 (192.168.1.20) to IGA3.

Menu Network -> NAT -> Address Mapping should look as follows now:

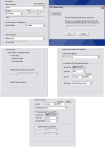
Step 3: Now we need to configure all other incoming traffic to go to our web server and mail server from Web Configurator, Advanced Setup, Network -> NAT -> Port Forwarding:

Posted in ADSL Router, Modem, P660 Series, Prestige, ZyXEL | 2 Comments

ZyWALL IPSEC VPN Failover and Loadbalancing using ZyWALL USG Devices


So another scenario, ZyXEL customer would like to load balanced and provide failover between their WAN links to route traffic for the VPN links having multiple links and VPN between two more sites using (ZyWALL USG’s) over VPN 1 and VPN2, so created a how to on this. Hope this helps.

Topology

Requirements

· Traffic between USG100-LAN1 and USG200-LAN1 will go through VPN tunnel. (Red link)

· Traffic between USG100-LAN2 and USG200-LAN1 will go through leased link. (Green link)

· Achieve high availability in case any of the links goes down

Solution

In above topology, load balancing can be achieved. You can see traffic with different destination will route via different path.

Then we have to achieve high availability in case any of the links goes down.

Suggested configuration

VPN High availability on both WAN1 and WAN2 of USG 200.

1. If USG200-WAN1 is down, USG100-WAN1 will try to build VPN tunnel to USG200-WAN2. So the traffic between USG100-LAN1 and USG200-LAN1 will go through VPN tunnel. (Red dashed link). This is VPN high availability

2. Once USG200-WAN1 goes up, USG100-WAN1 will still build VPN tunnel to USG 200-WAN1. This is VPN fail back. (Red link)

3. If USG200-WAN2 is down, USG100-WAN2 will try to build VPN tunnel to USG200-WAN1. So the traffic between USG100-LAN2 and USG200-LAN1 will go through the new VPN tunnel. (Green dashed link)

4. Once USG200-WAN2 goes up, USG100-WAN2 will still build VPN tunnel to USG200-WAN2. This is VPN fail back. (Green link).

Configuration Steps:

Part One: Configure the red link of the suggested topology.

On USG 100

1. Add address objects for the LAN subnets of USG200.

2. Configuring VPN gateway.

3. Configuring VPN connection.

Notice: In USG devices with 2.20 firmware, system will automatically create routes for VPN traffic according to VPN phases2 (VPN connection) local/ remote policy. Traffic whose source is in the local policy and destination is in the remote policy will be sent to the corresponding VPN tunnel. Thus there is no need to add policy route.

On USG 200:

1. Add address objects for the LAN subnets of USG100.

2. Configure VPN gateway.

3. Configure VPN connection.

Note : In USG devices running 2.20 firmware, system will automatically create routes for VPN traffic according to VPN phases2 (VPN connection) local/ remote policy. Traffic whose source is in the local policy and destination is in the remote policy will be sent to the corresponding VPN tunnel. Thus there is no need to add policy route.

About the configuration of the green link, you may refer to the above steps on both USG 100 and USG 200 , which will be the same …

Posted in Firewall, UTM, ZyWALL USG, ZyXEL | 20 Comments

WAP3205 in Universal Repeater Mode


Question: How do I set up the WAP3205 in Universal Repeater Mode?
ID: SD-10011
Model: WAP3205
Firmware/Driver Version: 1.00 (BFR.3)
Prerequisite Information: Main router SSID, wireless encryption method, wireless channel number.
Answer: Setting Up Universal Repeater Mode

This document covers the options and steps for setting up the Universal Repeater Mode on your WAP3205 wireless access point. This document assumes you are at least up to firmware V1.00(BFR.3)

Step1: Logging Into Your WAP3205

Before we can log into the WAP3205, you will need to statically assign an IP address to your computer. Assign your computer with any IP address between 192.168.1.3 and 192.168.1.254.

Connect your computer to the wireless router using an Ethernet cable. Make sure to plug into one of the two LAN ports on the back of the WAP3205. Then on your computer, open either Internet Explorer or Mozilla Firefox. Clear out the address bar at the top of the screen and type in 192.168.1.2.

After typing the IP address of your router and hitting Enter, you should get the WAP3205 login window. For the default password, use1234. Click on the login button once you have entered the password.

Once logged in, you may be asked to change your login password. You can make a new password or just click “ignore” to keep the password as 1234.

Step 2: Changing Settings in Expert Mode

Once logged into your router, you will need to select the Expert Mode option on the main screen.

Once you are on the Expert Mode page, click on the Maintenance icon on the left.

Then click on Maintenance and select Sys OP Mode under it. Then select Universal Repeater Mode and click Apply.

Once the unit has finished changing settings, log back in and return to Expert Mode. Then click on the Configuration icon (the two orange cogs).

On the General Tab, un-check the box for Auto Channel Selection. You will need to find out what Channel Number is being used for your main wireless router. You may need to log into its wireless settings to find what it set to. If it is set for automatic, manually set the Channel Number to 1, 6, or 11. Once your channel is selected, click Apply to save the settings.

Make sure the channel number on the WAP3205 and your main router are the same! The router being connected to must also have the channel number manually set, not automatically. They must be the same for Universal Repeater Mode to work!

Next click on the Universal Repeater tab at the top of the page. In here you will need to enter the SSID of the router you want to connect with (MAC address is not needed). Then set up the security to match the security of your selected router. Make sure the wireless security settings match in this section and on your router. Once you have entered your settings, click Apply.

If your wireless security settings and channel number match then you should be connected now. Click on the Status icon on the left side of the screen to be taken back to the Status Screen. At the bottom of Device Information is WLAN Station Status. If it says Disassociated, you are not connected. If it shows the SSID of your wireless router, you are connected.

Notes:

In order to get on line, make sure to set this computer back to Automatically Obtain an IP Address. Once set this way, you should get an IP address from your main wireless router when connected to the WAP3205.

Something else to note on the WAP3205 is that setting up the Universal Repeater Mode does not set up wireless security for the WAP3205. The wireless rebroadcast is separate from the SSID and wireless encryption settings of the Universal Repeater. You will want to configure your SSID and security settings on the Configuration page (under the General and Security tabs). These settings can be completely different from the settings of your main wireless router.

Also, you do not need to change the LAN IP address of the WAP3205 to match the LAN IP subnet in order for traffic to pass through. (The WAP3205 is set to 192.168.1.2 and your main router is set to 192.168.10.1) But, in cases where you want to be able to easily configure the WAP3205 after setup, you should change the LAN IP address on the WAP3205 to be in the within the same range of the main router (192.168.10.1 and 192.168.10.2). Changing the WAP3205 IP address is also important in cases where the main wireless router hands out IP addresses (DHCP) which could be in the range of the IP the WAP3205 is already set to.

Example:

Your main wireless router has and IP address of 192.168.10.1 and its DHCP range is from 192.168.10.2-192.168.10.22. And your WAP3205 is still at 192.168.1.2. To give it a safe IP address (that will not cause conflicts), you want to make sure it is out of the DHCP range of the wireless router. By setting the WAP3205 to 192.168.10.x you will be in the same IP subnet range of the wireless router. And by having it set to 192.168.10.23-254, you will be out of the DHCP range of the main router.

By having the wireless router and WAP3205 in the same IP subnet range (the 10 in the 192.168.10.1) you will be able to log into the WAP3205 with out having to statically assign an IP address to your computer. Since your computer will already have an IP address form the wireless router which is in the same IP subnet of the WAP3205, you only need to enter the LAN IP of the WAP3205 in order to log in. You won’t need to statically assign the IP address on this computer.

Posted in Access point, Wifi, Wireless Extender, ZyAir | 11 Comments

Prestige ZyXEL P661HW-61 / P660HW-D1 IPSEC VPN and Greenbow IPSEC Client set up


Right, this is how to configure the ZyXEL P661HW-61 OR P660HW-D1 to accept incoming IPSEC VPN connections from a client PC running the ZyXEL IPSEC VPN Software.

IPSEC Client can be downloaded from the link below and comes with a 30 day trial.

ftp://ftp.zyxel.co.uk/ZyWALL_IPSec_VPN_Client/software/

1) To begin you will need to setup the router with the following VPN configuration details.


2) Once this has been done and the configuration saved you will need to complete the setup for the ZyWALL SafeNet Remote IPSEC VPN Client Software as demonstrated below:

Posted in ADSL Router, Modem, P660 Series, Prestige, ZyXEL | 2 Comments

ZyXEL Virtual Devices – WebGUI Access


Okay, on a number of times, I have been requested to provide a demo unit before someone is willing to purchase the unit, for the sake of look and feel of the unit.

Do you know that you can access the following website which is hosted by ZyXEL Germany and run most of the device and allow you to see the Web Configuration, allows you look and feel before you purchase the unit.

http://zyxeltech.de/

Posted in Access point, ADSL Router, Firewall, Modem, Muhammad Adeel, P660 Series, Prestige, Uncategorized, UTM, Wifi, Wireless Extender, ZyAir, ZyWALL, ZyWALL USG, ZyXEL | 2 Comments

Changing Port Speed and Duplex on USG


A very easy but useful tip, how would you change the port speed and duplex on my new spanking USG box.

Just Telnet or SSH on your box and follow the screen below.


Posted in Firewall, UTM, ZyWALL, ZyWALL USG, ZyXEL | 1 Comment

Welcome ZyFans !


What’s up with with that “Zy” prefix,  a few months ago I brougt in an access point home with a impressing blue soft glooming light and “ZyAir” printed on it, my wife got confused and the question got fired as usual “Was that a gift from the Airline you flew with on your way back home yesterday” ? I just looked at the access point again and said, well my dear that’s not from a present from an Airline but a ZyXEL device that is going to out new wireless access point to provide wireless coverage.

So, you are probably thinking, who am I, a ZyGeek ? I guess working for ZyXEL that kinda makes me one 😉 No, I am not any ZyWall, ZyNOS, ZyAIR, ZySwitch, ZyRouter, ZyNASBox or ZyAnything, lets just say I am just a normal geek who makes his living by Networking. The good thing is that I have some great and exciting experiences, which I would like to share with you guys benefit and get the most out of your ZyXEL devices and save the time and money by NOT melting down on to ZyHelpdesk phone lines 🙂

Okay, so stay tuned, I promise to give you the best of my ZyKnowledge 😉

Posted in Access point, ADSL Router, Firewall, Modem, Muhammad Adeel, P660 Series, Prestige, Uncategorized, UTM, Wifi, Wireless Extender, ZyAir, ZyWALL, ZyWALL USG, ZyXEL | Tagged , , | Leave a comment